Whirlwind Week

Back in Oklahoma it's back to a busy week of shooting club matches, practice days and rounded the end of the week with a trip to Arkansas for their club match today.

Last Saturday Missouri Mae and I ran a shooting clinic for 11 keen shooters. By all accounts it went well with those reporting they'd learnt some new things and we're happy to receive new tips. I wish them all the best for their future of shooting!

Sunday was a great day for them to follow up on their newly acquired skills with The Territorial Marshal's club match. Jack and I had a blast shooting with these guys again and there was an exceptional turnout of 65 shooters.


Wednesday, besides being a much cooler day, was practice day and for 11 of us that showed up for that we got through 6 stages pretty quick and headed off to 'go eat'!

Yesterday Jack decided we should head to Arkansas to shoot with Judge Parker Marshal's at Fort Smith.

We drove into town from the West and was looking for the new Marshal's Museum but alas it still hasn't started construction. It is reported to be opening in Sept 2019.

There is some new mural art on the sides of buildings that I noticed.


The club match today was good, attended by 15 cowboys and cowgirls.

Six great stages with everything from single tap to multi tap sequences and a variety of target sizes and distances. We are both pretty happy with today's effort.


For now, it's plan, pack and get ready to get on the road this week to Louisiana, then on through to Texas before heading back into Oklahoma for Land Run.

Look forward to seeing you on the trail somewhere!

Kat xo


The Gamblers Overland Co.

There's a new stagecoach coming to town when The Gamblers set up for the Heartland Territorial in July this year.

One of the projects Jack and I worked on this time was the building of a stagecoach for The Gamblers.

Jack had worked out a design and with the use of Mad Dog Tannen's shed and tools, we set to creating saw dust. A couple of days of drawing out and cutting and we had a blank slate ready for me to paint.


After a few questionable moments, we finally got things together with some changes or new ideas brought in along the way. This stagecoach needed to pack down which we managed to do in the lightest and easiest construction we could think of.


After many days, The Gamblers Overland Co. came to life and appears to be sitting in Monument Valley somewhere at dusk (well actually if you look closely, the left hand shelf has the two mittens featured on it 😉 )


Finally, it has 3 shooting positions – front of stagecoach table, door table and the rear table. Oh! And Jack cut the spokes for the wheels in two flat sheets and decided that he wanted them to sit out from the coach and to roll?!

She's all varnished up and looking mighty purty! For a full picture however, well, you'll just have to wait 'til July when she gets rolled out on her maiden voyage at 'Another Roll of the Dice'.


See you on the Gold Coast in July Gamblers!

Kat xo


1890’s for me!

Yes! I'm doing a gown for me! Yay!

Thanks to Annie Hicock for passing on some check flannel fabric and for an inspiration photo that I found on Pinterest I felt a new 1890's gown would be the go for me.

My inspiration – this sweet little, simple looking skirt and bodice. Now the hat I had already made on a trip to Texas last December?! It just needs the finishing touches of brim trim and a dead bird or feathers as such.


Meh, still thinking about that decoration seeing as I didn't get to the shop in Mount Tamborrine that has the most divine hand constructed velvet flowers.

Back to the main construction and I started on the skirt using a Buckaroo Bobbins pattern of the Primrose Skirt. That will work but I didn't want the semi check plaid running straight across. Nothing like making work for myself. (She says rolling her eyes)

The fabric had that much movement in it I was almost tempted to give up and construct something else. Always up for a challenge, I persisted after I got to match the front panel how I wanted. (Now with somewhat gritted teeth)

Eventually I got all the panels around the skirt to match as close as possible and I got to thinking about how much fabric the pattern matching was using up and whether I would have enough for the bodice. I also had some black velvet on the shelf and decided the inverted pleat section in the rear of the skirt would look good using this. It will certainly match in with the use of it for the waistband.


With the saving I made using the velvet I had enough of the plaid fabric to definitely play with further pattern matching on the bodice.

It's time to use the old noodle and work out how in the world I can create the look I want with the bodice and the hidden closures required to get in and out of it.

I got that semi worked out, fabric's cut and pieced together in order for it to look like a blouse (shirt waist) and short jacket. So far, so good.


For now, I'm on track. I need to do some more deciphering of the inspiration photo and research closures to see if anything matches with the idea in my head.

Brain power required.

Kat xo


Mountain Lion, Horse and Dog

What on earth could these three things have in common?

I'm glad you asked, oh you didn't? Haa Haa, well I do have a little story about them and it all started with a request from Lil Magill for her next interesting B-Western costume.

This time Lil had found a vintage 1940's brown gaberdine shirt and skirt featuring, you guessed it, a black mountain lion, dog and horse with a chenille palm tree like detail.

After discussions about changes of colour etc we decided to keep it to the original as close as possible.


I set to finding fabric similar to the original and during this quest for fabric, trim and snaps, Lil's brother John contacted me wanting to have this for her Christmas present. I'm sure she was presently surprised!

Now, around the time of initiating the project Jack and I were actually visitin with Texas Mac and Texas Flower. Flower and I were deep in conversation of the outfit and we both wondered as to the unusual grouping of the dog, horse and mountain lion.

As enquiring minds tend to do, I threw it into a Google search and to our surprise (and now this presents a whole new surprise to Lil. SURPRISE!! 🙂 ) I found a 1957 Golden Book – Roy Rogers and the Mountain Lion.

I could not believe my luck! I bought it straight away as a gift for Lil to go with her costume. The book itself other than some minor foiling missing on the spine does not appear to have ever been read. There are no creases in the pages, no writing in the 'This book belongs to' section and is in excellent condition.


Now I could get into the costume and get cracking. Eventually I found suitable mountain lion, horse and dog embroidery designs that I could then spend time changing colours and getting it to look close to the original.


The embroidery floss chain stitch detail was to follow and I'm feeling pretty pleased with myself at how it's coming together.


Finding the right fringe proved again to be an interesting feat so I purchased a longer version and spent time cutting it back to the required length. I eventually found the black snaps required. (actually should have been brown but as Mum says 'a blind man on a galloping horse wouldn't see it')


I altered the usual cuff pattern to make up similar to the original and was very pleased with how this turned out. It's all coming together nicely!

Next to last was the fringing and it looked terribly long, checking my measurements and a quick message to Lil meant 4 inches needed to come off! Unpick the fringe, cut, stitch and reapply.

Finally the hand stitching was completed and the snaps are on and the 'Roy Rogers' inspired outfit is ready for sending!

So looking forward to seeing you wear this one Lil!


Cheers and stitches!

Kat xo


When In Texas….

It's go bold, go big or go home! Lol!

So here I present the 'I Love Texas' outfit that I made for Pistol Packin' Pami.

You would have seen it boldly worn at the Ben Avery Shooting Facility in Phoenix at Winter Range 2018! (Tuesday over there)

Others desiring this similar theme were a little disappointed when I said I couldn't do a corset for them because 'somebody else' was already getting it.

Pami wanted a Texas flag corset incorporated with blue bonnets and the main part to be like the flag. We put our heads together and came up with the star embroidered on the blue, the red and white on the left as per the flag – perfect – and at the back the two middle sections would be white and feature the Texas state flower, the Bluebonnet. (The 'lupinus texensis' the bluebonnet was adopted as the official state flower by the Texas legislature in 1901)


Pami, being a colourful character who I treasure, loves colour and so we went with a red top with a small blue and a white frill in a style she is familiar with.


Her flamenco styled skirt in red features a blue frill with white embroidered stars, the white frill has a smaller version of the blue bonnets and a plain red frill – see where I went with that? Keeping it in similar order to the flag itself.


With, of course, a quick little headpiece to boot!


The final product and one very happy cowgirl! You look amazing my friend, can't wait to see more photos of you in this outfit on range.


Somebody please post more pic's on Facebook so I can see it in all her glory!

Kat xo


Shoot Low! They’re Ridin’ Shetlands!

In some form or another this line has appeared in songs (Texas…….), movies (Butch Cassidy and the Sundance Kid) and a book title (by Lewis Gizzard).

Bloody funny and for some reason came to mind when I finished the new horse prop for the livery.

Keeping things proportionate when enlarging them meant my horses ended up a little on the short side and perhaps if I'd just done two, then their heads would have filled the window a little more than the 3.


That's okay though, we are getting more air flow through which is what we wanted to maintain.

I took a scrap piece and created the 'Greenhill Farms' sign to install above the window. Injecting a hint of another shooters alias into the range. Greenhill Bart has made the horse table props for the range and being from a farming background so I thought it appropriate to use that for this piece.


So welcome to the Greenhill Farms equine establishment! Today we are selling Shetlands! Cheap at half the price! Haa haa haa


At the mine I'm creating a couple of neat pieces featuring miners – they are still to come. Another scrap piece however I've created the tag board. Miners would place their tag on the board upon entering the mine and at the end of each day you would remove your tag as you came out.


We saw a display in Walsenburg, CO which had been called 'Numbers Up' meaning if work was completed for the day or something had gone wrong in the mine, who's ever tags were left on the board meant your number's up, you weren't going home and miners could be identified.


That's it! See ya!

Kat xo


How Many?

Apparently 6 stages, lunch and a 20minute car ride re-watching the days shooting videos, only to see a steel bone sticking up out of the back of your corset!! Haa haa haa and yes there were others there – 19 in total!


The weather was a little windy and overcast but a hell of a lot warmer than in previous weeks.


Sunday we headed to Cushing for the club match. Stages were fast with plenty of movement and a good variation of single tap and multi tap sequences.


Jack shot a really good match ending up with just less than a second between us with my stuff ups for the day. Keeping me on my toes he is!


Hope you had a great weekend and are into another fabulous week!

Kat xo


Here’s Yer Sign!!

Well, this is a sign to behold. One of the secret squirrel projects prior to Christmas was a special request from Texas Jack Daniels.

The idea was for a pack down prop to be put up outside their RV when on ranges across the nation. Many cowboy's distinguish their spots by flags, lights, signs etc and this one is sure going to let you know that you have arrived at Texas Jack Daniels (TJD) and Shotglass' camp.

The requirements: a gambler, a saloon girl, the Texas flag, a bottle of Jack Daniels, a shot glass, their aliases and should measure around 3ft tall by 4ft wide when assembled. Okay! Let this brain get thinking a little and see what I can come up with.

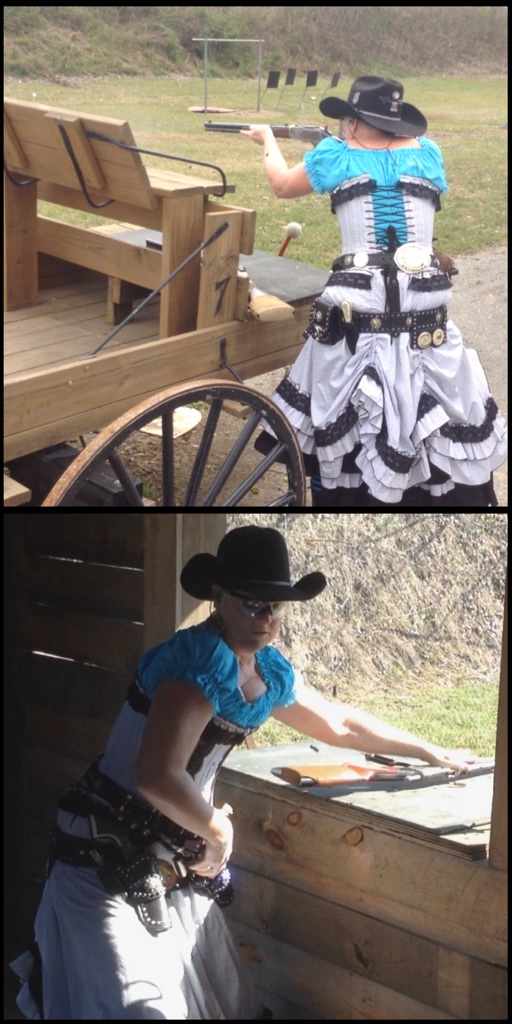
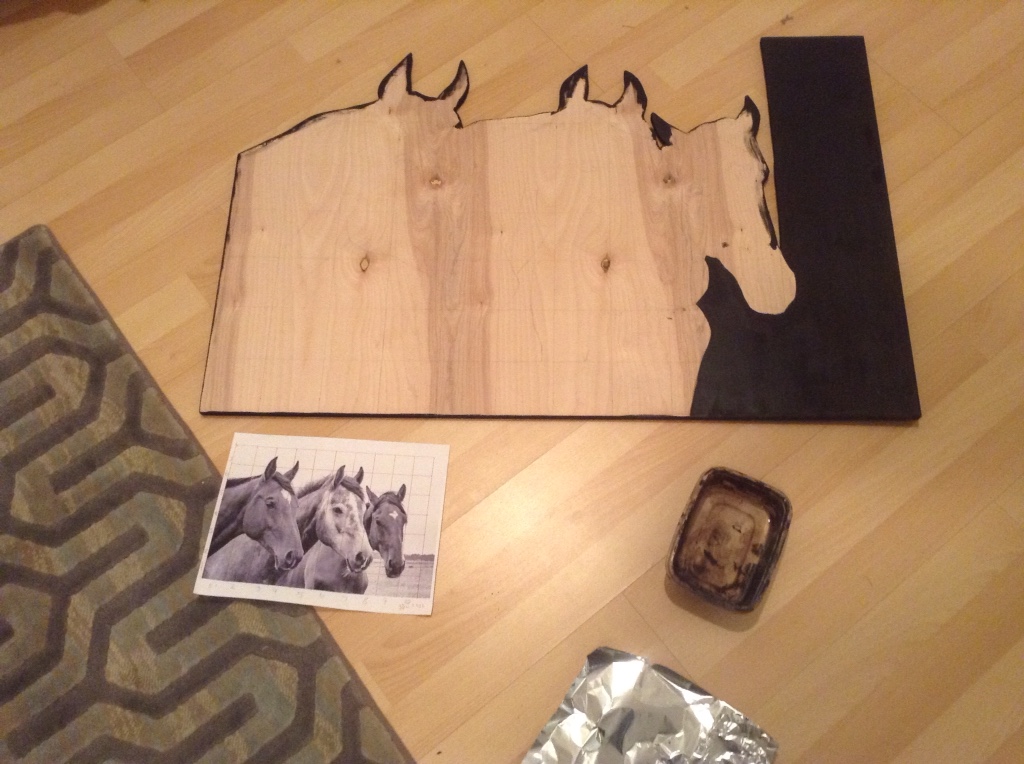
After a short time of contemplation and use of a couple of actual photos of TJD and Shotglass, I sent through my thoughts for approval. Next I drew it out on timber and we were under way!

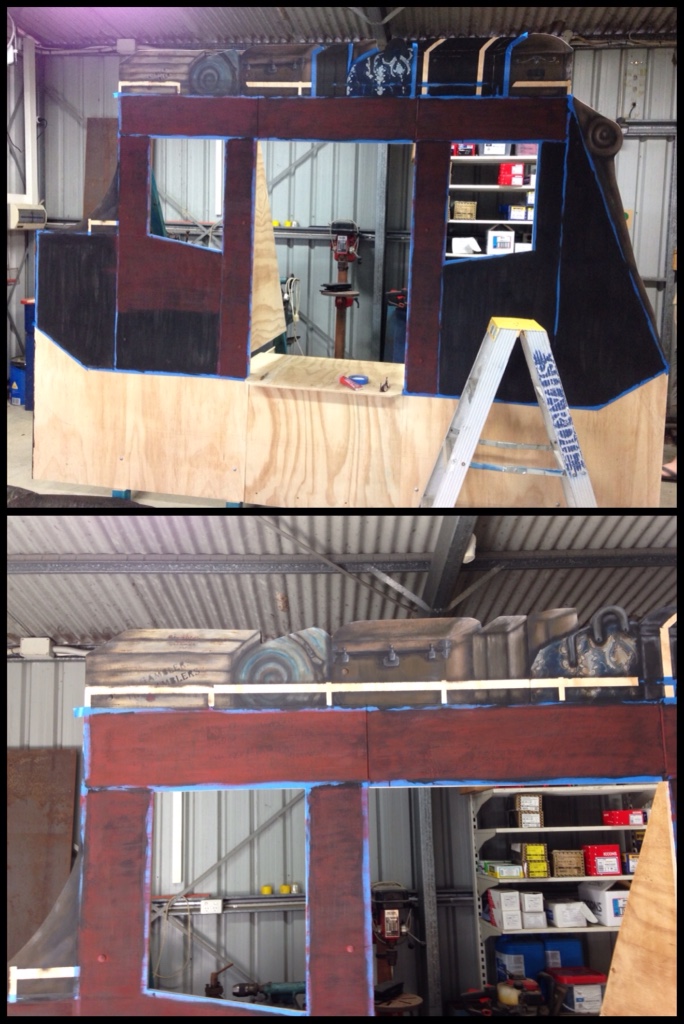
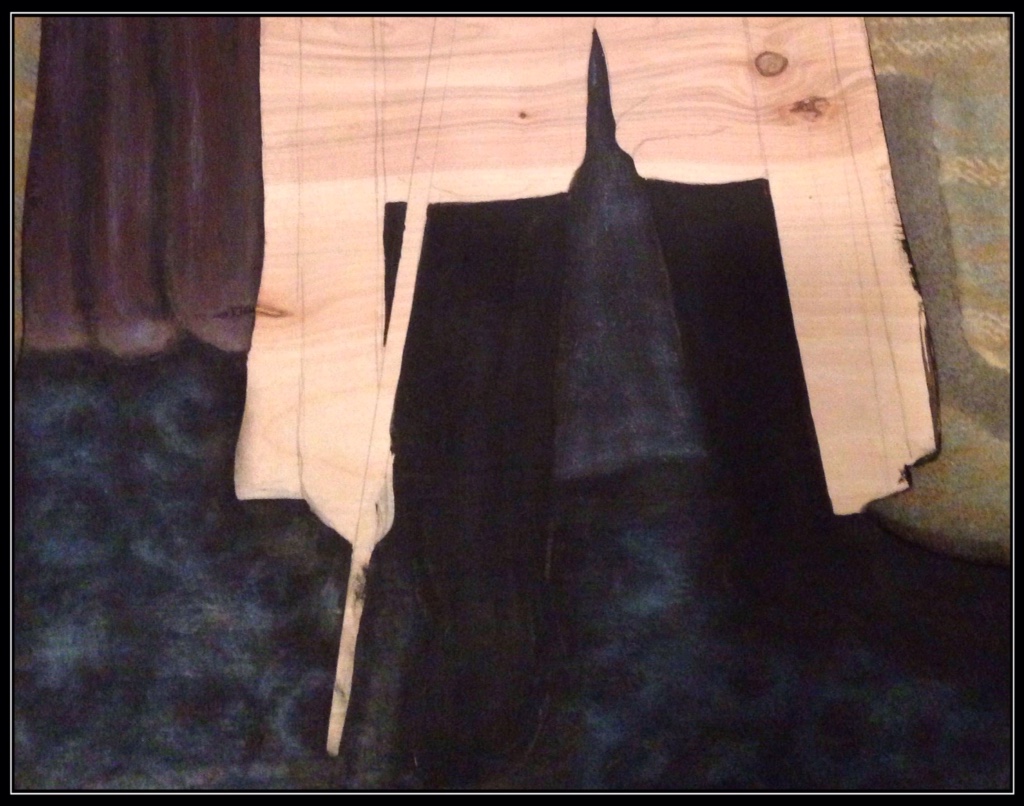
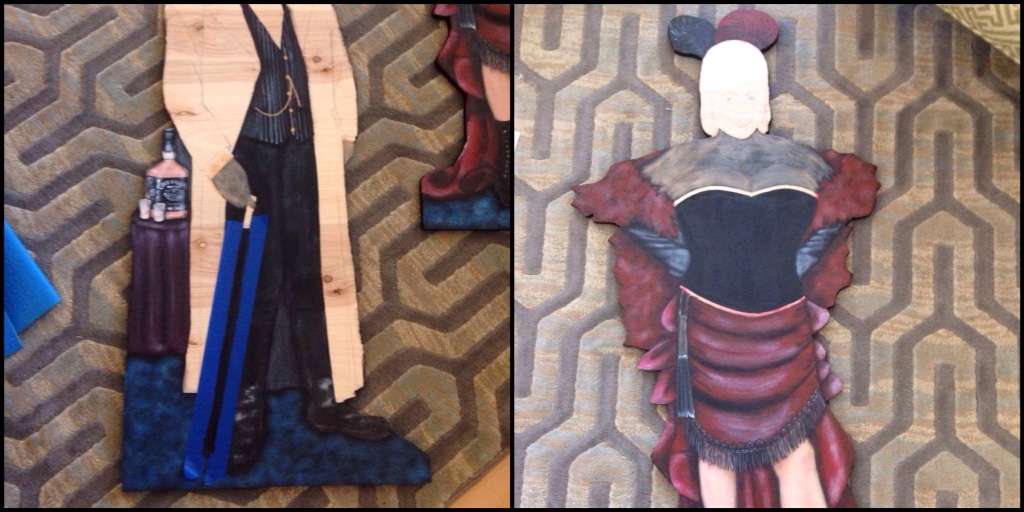
Stage 1: drawing the design on the timber, took me a long time to draw the saloon girl face, (anything else but face's is my usual thought)


Stage 2: cutting, sanding (yes, did it myself, she wouldn't have had feathers on her boa otherwise)


As TJD was keen to see it to completion with photos to give Shotglass for Christmas, I cracked on.

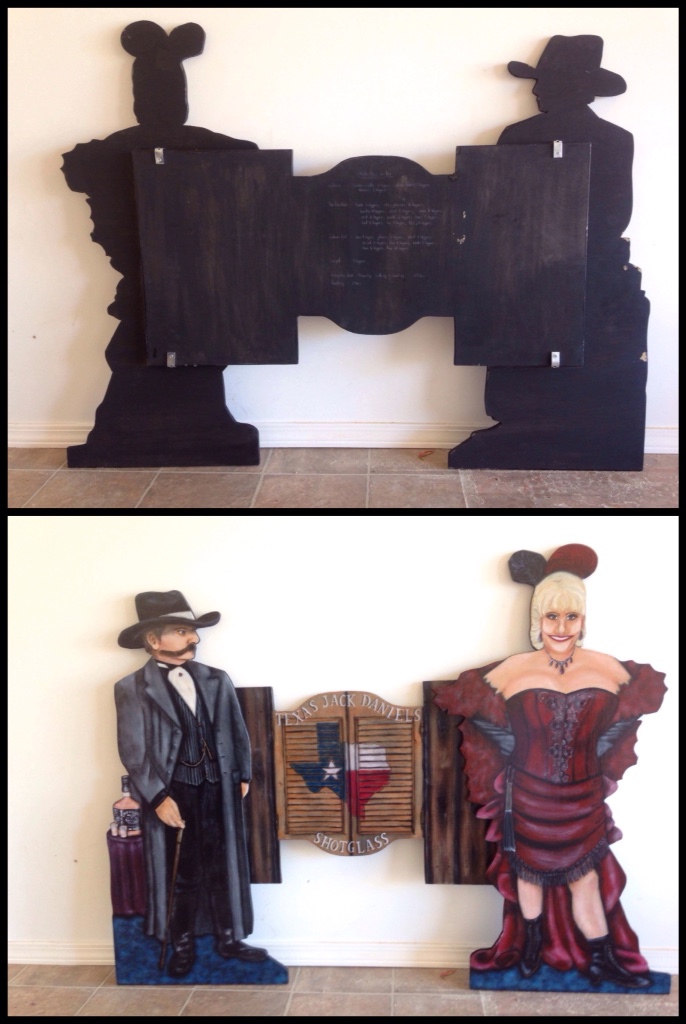
Stage 3: black – everything I do for props starts with a black base coat. Saloon walls, gambler hat, saloon girl feathers, background between her arms and carpet


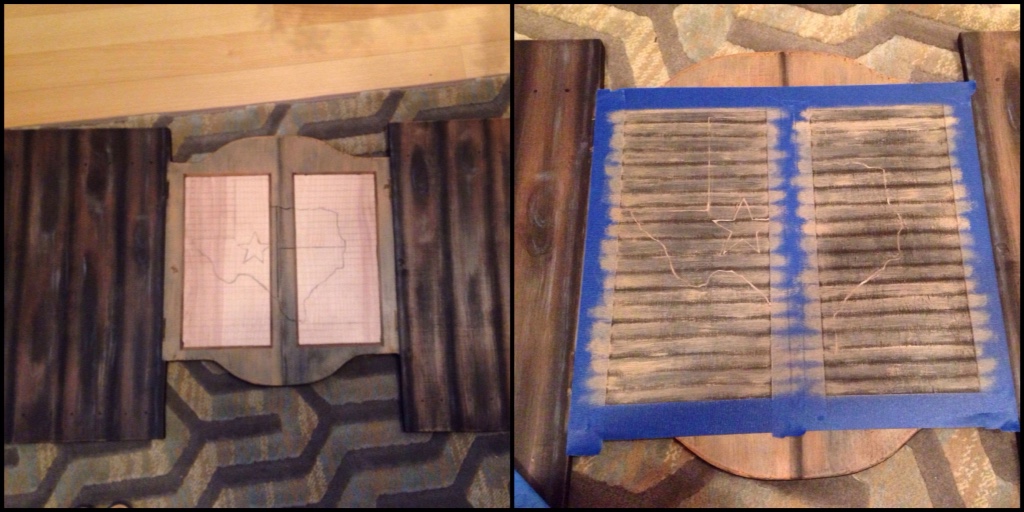
Stage 4: saloon walls first


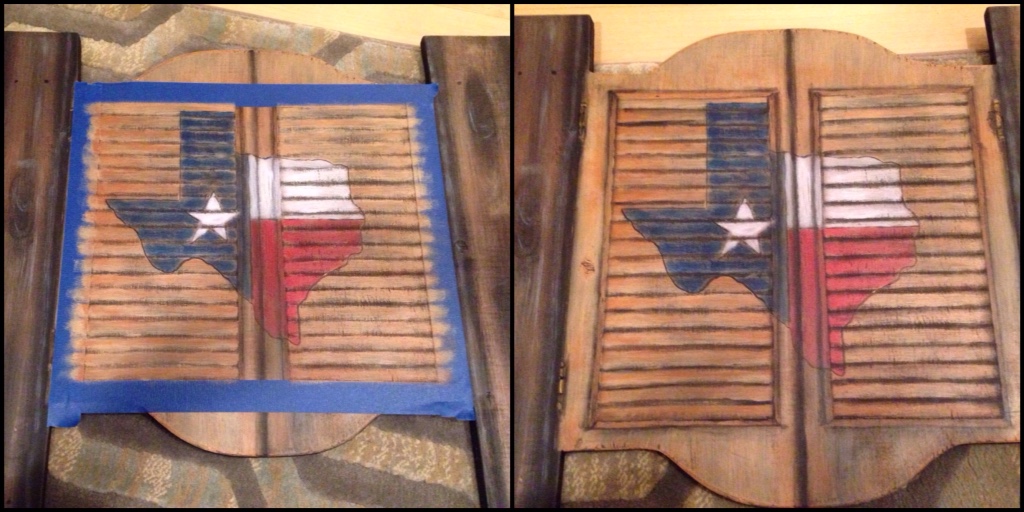
Stage 5: working on the saloon doors, layer by layer


Stage 6: adding a bit of Texas flair, keeping the louvre door look happening, more shading and hinges


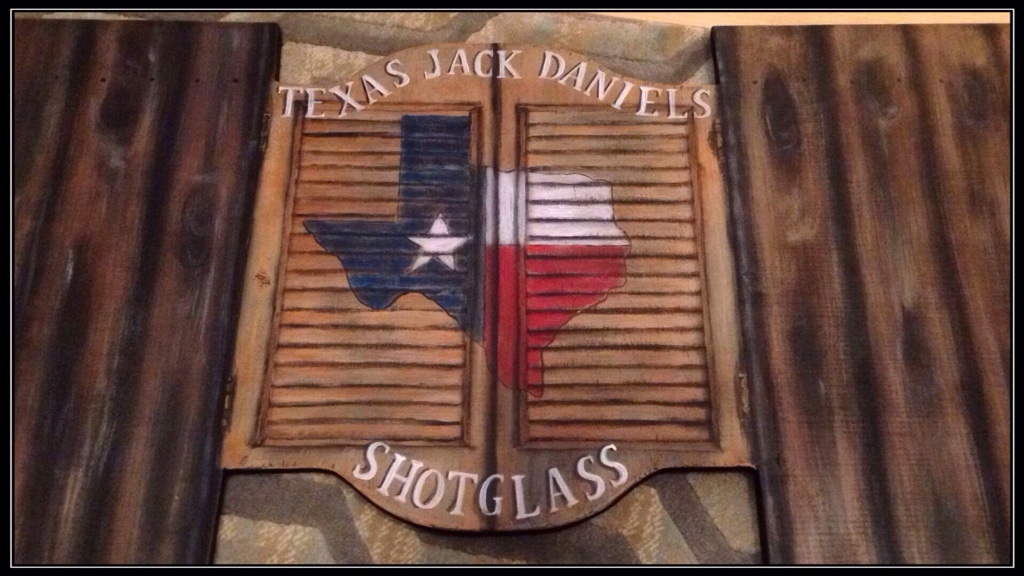
Stage 7: aliases (hmm taking a look at the aliases now, I see a flaw that I may have to rectify. The aliases are flat and by saying that I mean if you look where some of the letters flow from flat timber to louvre – should be shadow)


Now fixed!

Total layers: timber walls 6 layers , saloon doors 7 layers, aliases 3 layers.

As each day drew to an end I would send TJD a number of photographs of the progress.

Always starting from the background first it was onto the gambler. Depending on where it was at and if waiting on paint to dry, then I would switch over to the saloon girl or add more detail if I thought a section needed more.

Stage 9: onto the carpet for both


Stage 10: the table in the background was next. My original thought was to have the gambler holding the bottle and still hadn't quite worked out the shot glasses. The photo had a table in it and so became the perfect idea to include it for the bottle and shot glass.

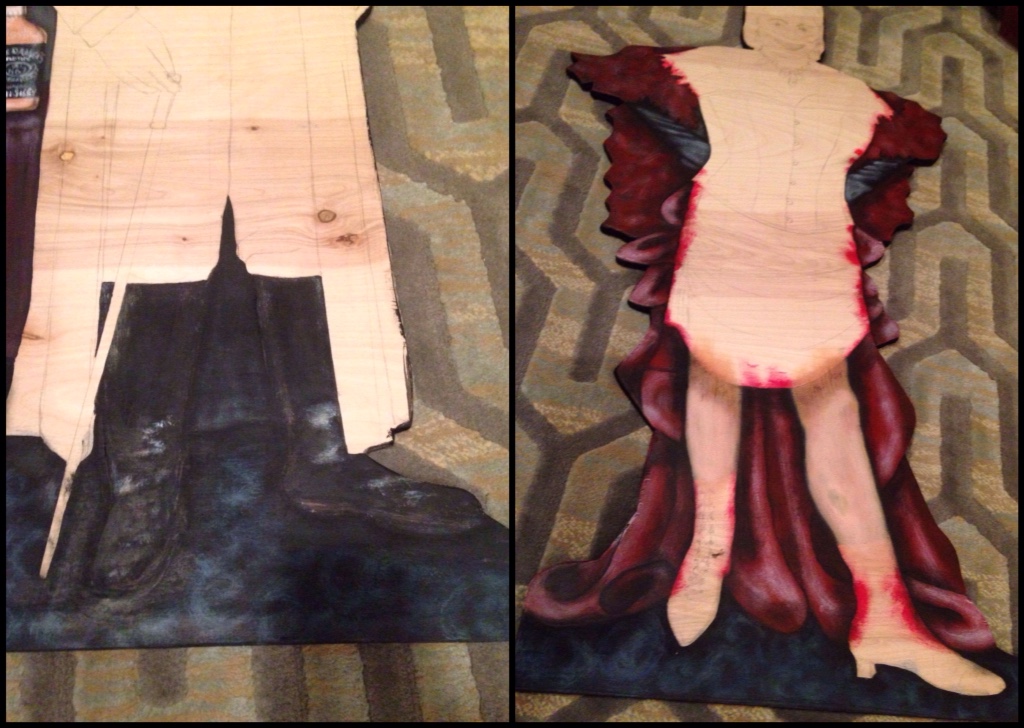
Stage 11: boots and pants


Stage 12: saloon skirt, boa, gloves, hair feathers – we both decided red would be a great colour to make this pop, besides, it is one of Shotglass favourite colour's also.


Stage 13: whiskey bottle and shot glass, saloon girls legs


Stage 14: more shading to gambler boots and saloon skirt


Stage 15: black base to saloon girl boots, apron front of skirt and gambler vest


Stage 16: continue shading saloon girl skirt, boa and apron front. Stripes, buttons and chain to gambler vest with additional shading.


Moving right along into another day and I'm starting to get to finer details on some areas.

Stage 17: let's add some gimp trim and fringing to the apron front and black in the fan.


Stage 18: detail to boots, eyelets, hooks, laces and detail the fan


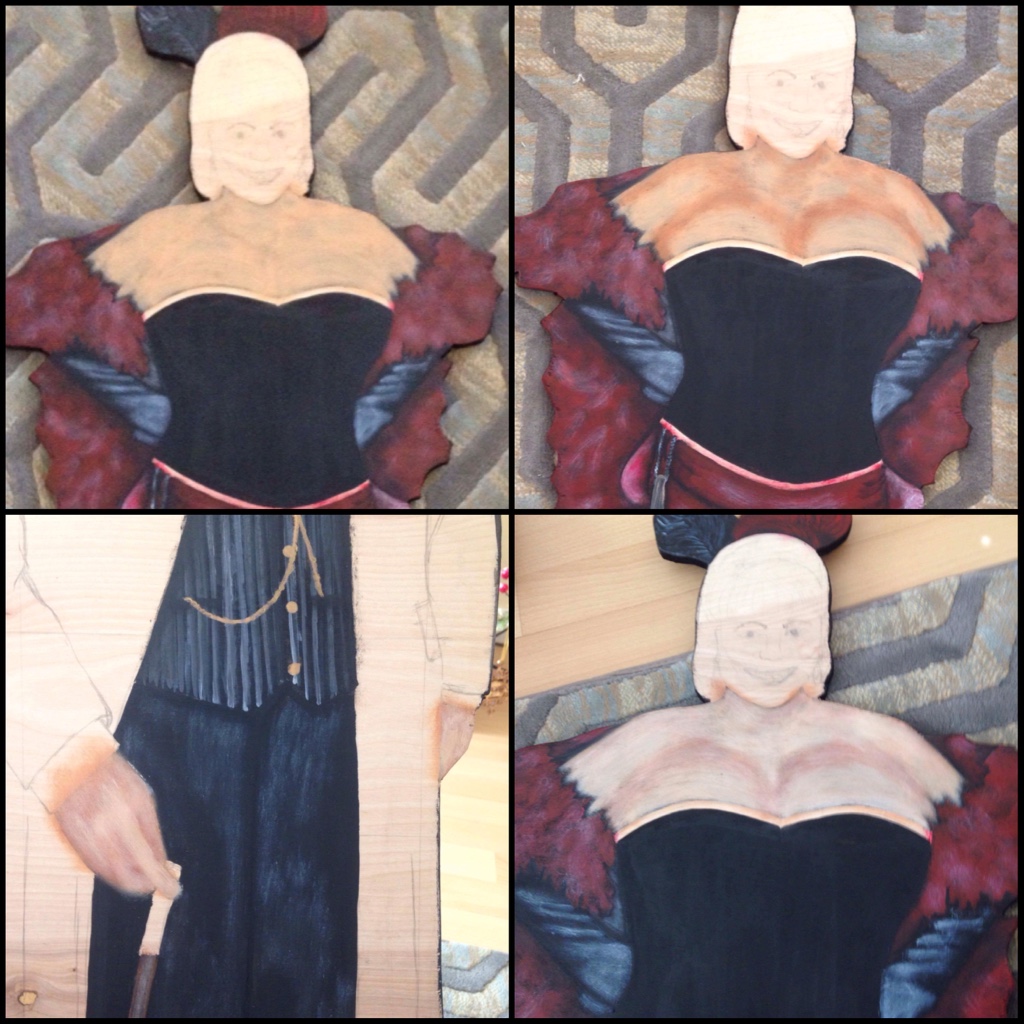
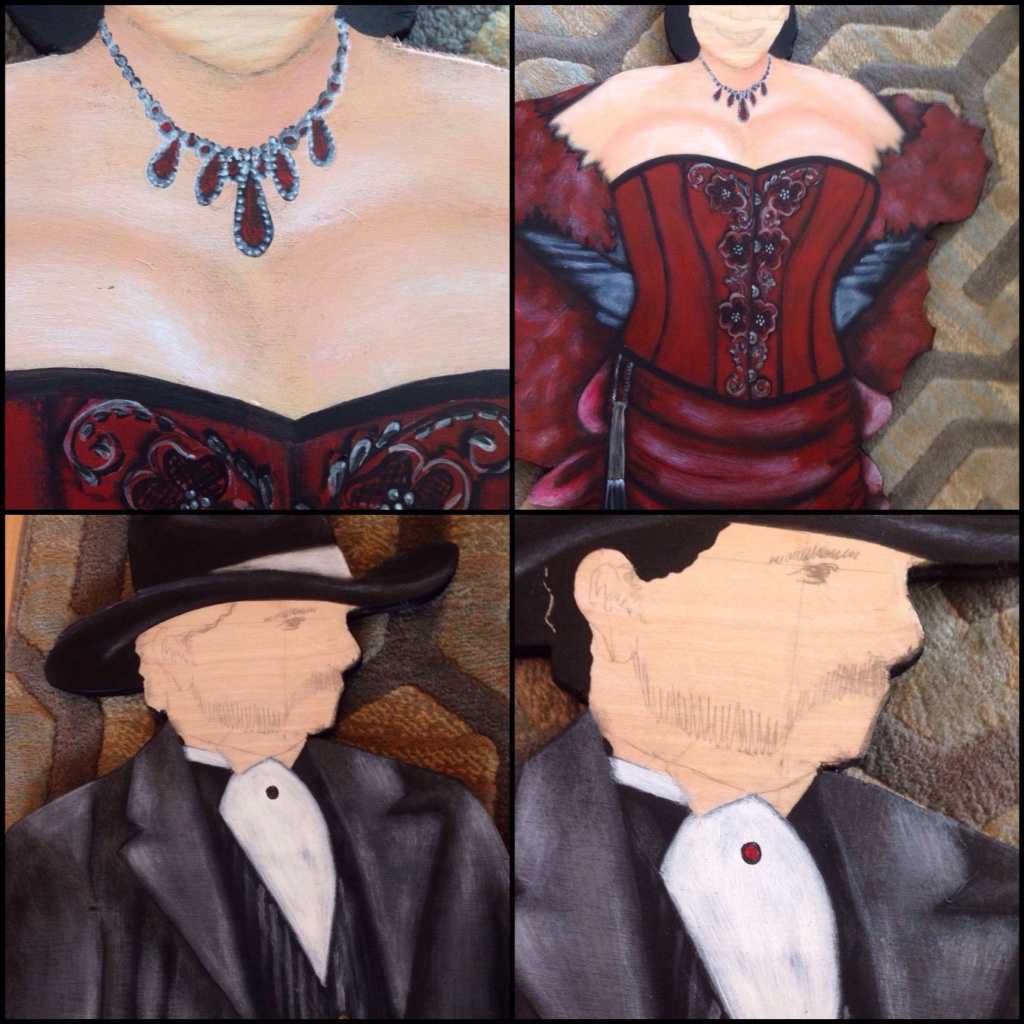
Stage 19: flick back to the gambler and it's time to do the cane and hands, black in the corset and bust of the saloon girl


Stage 20: skin layers take time


Stage 21: black in the gambler coat and start shading


Another new day dawns and I'm still thinking about how to give the corset more detail rather than just a colour.

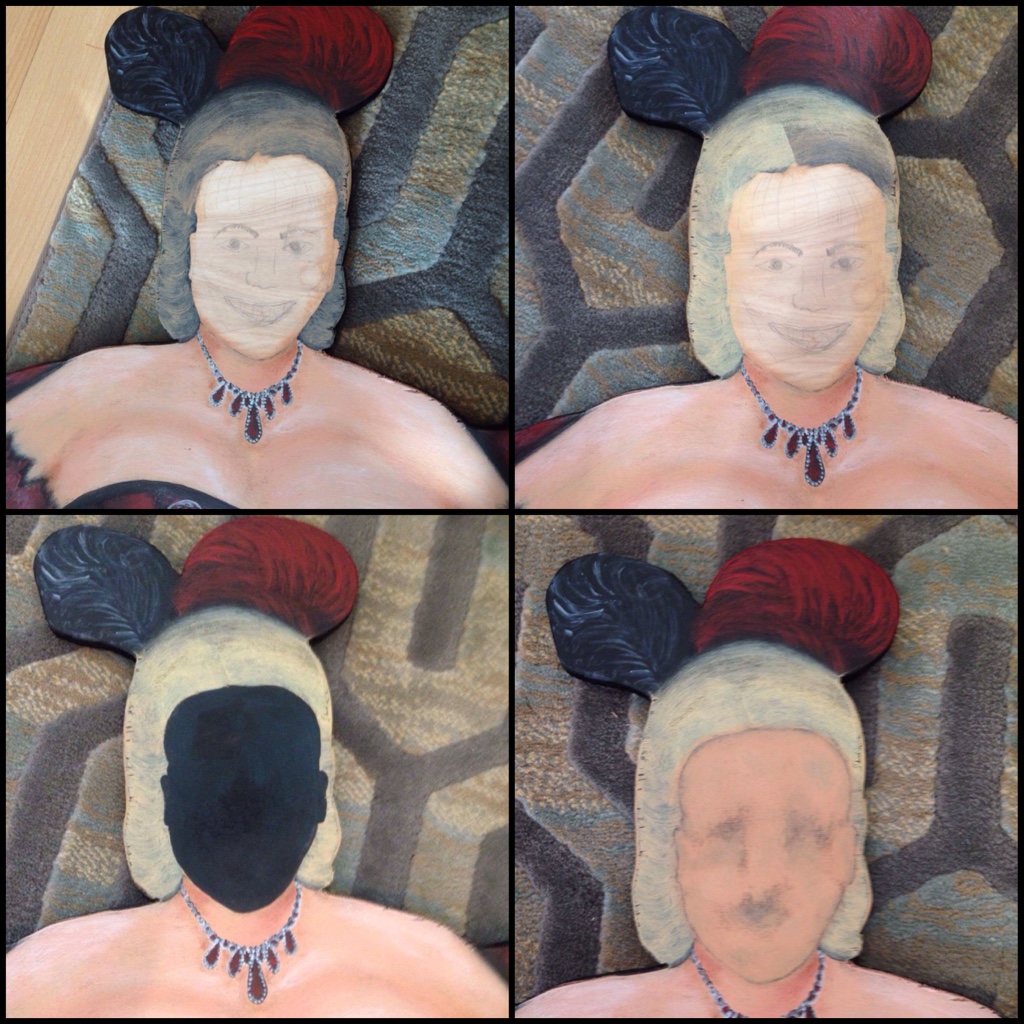
Stage 22: add red shading to corset, black in hair


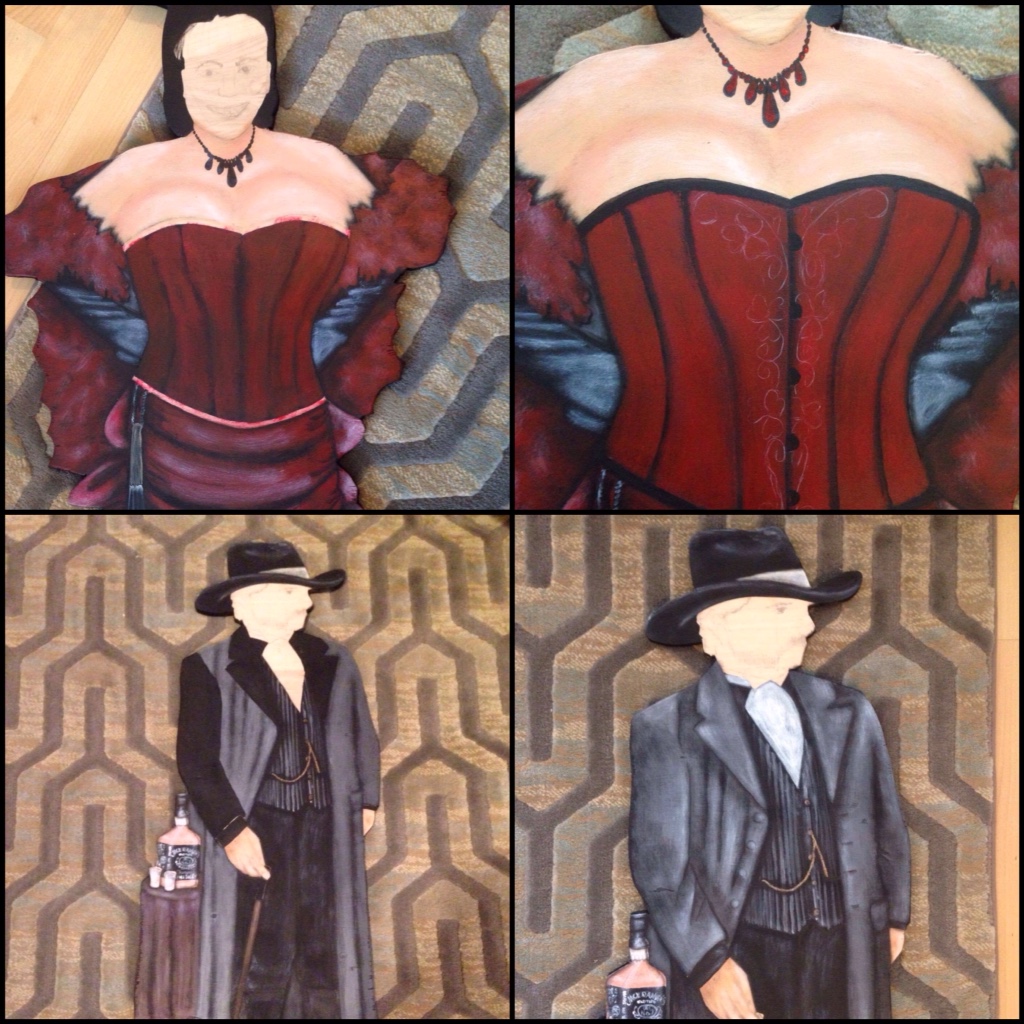
Stage 23: she needs jewellery – draw, black in, shade more to corset, shading to gambler coat arms, cravat and tie pin, add colour to necklace, draw in lace pattern to corset.

Stage 24: shade jewellery, paint lace and shade corset. Tie pin, collar and cuffs, hatband


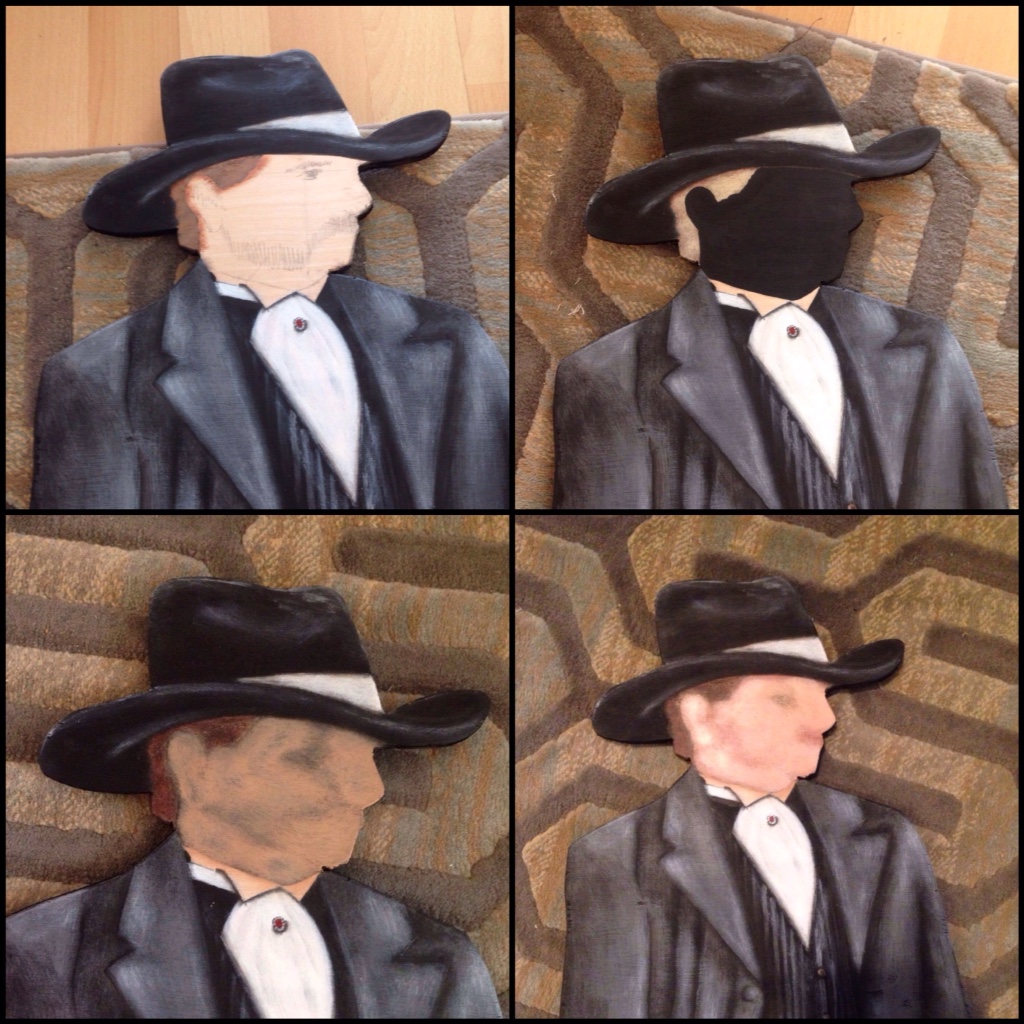
Stage 25: do both their hair, shadowing to gambler hat, and face skin tone


Stage 26: moustache and eyes to gambler, fringe, earrings, facial features to saloon girl (starting to sweat now, really want to get this face right)


Stage 27: more shading to facial features to both, hat shadow to face of gambler, touch ups where required.

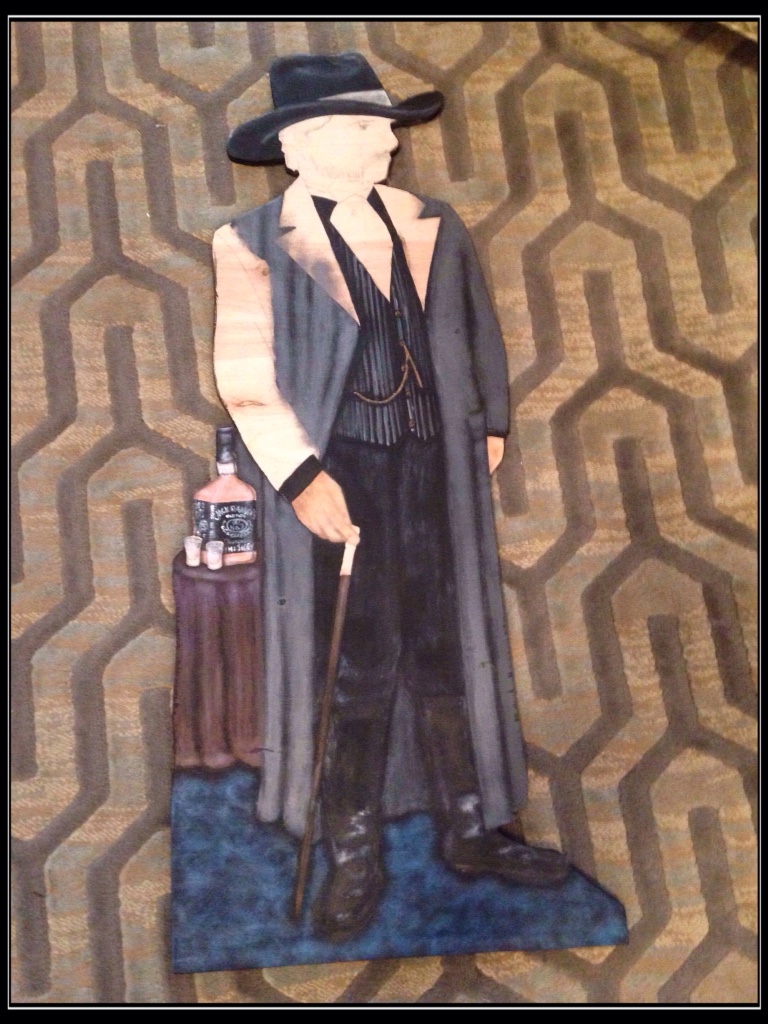
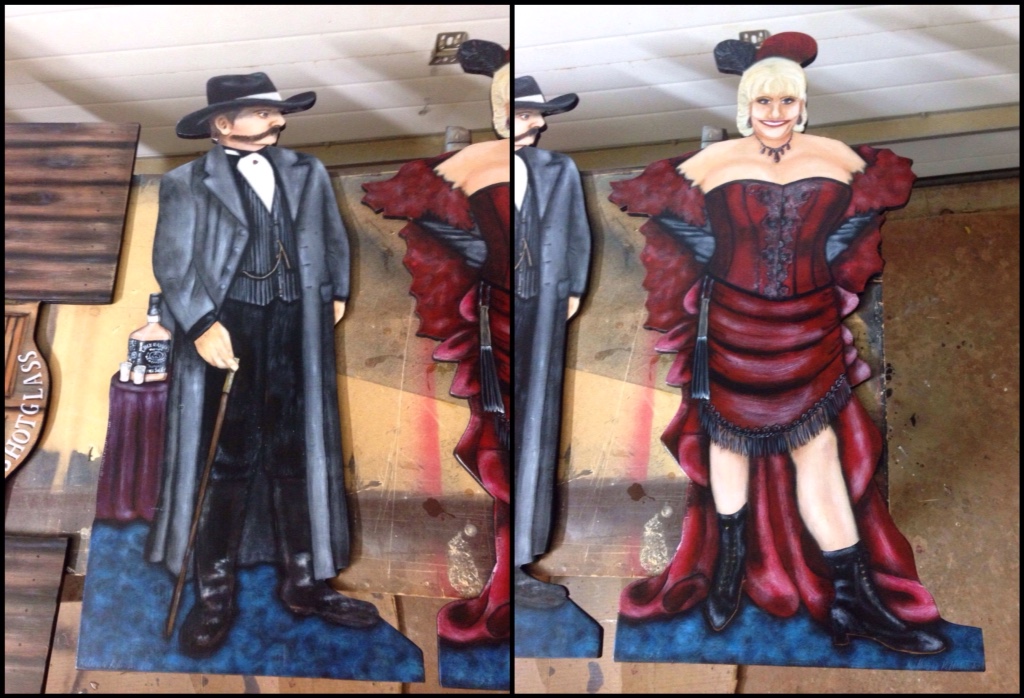
Stage 28: stand back and admire my own handy work. Loved working on this piece!


Stage 29: lacquer! Now the colours really pop!!
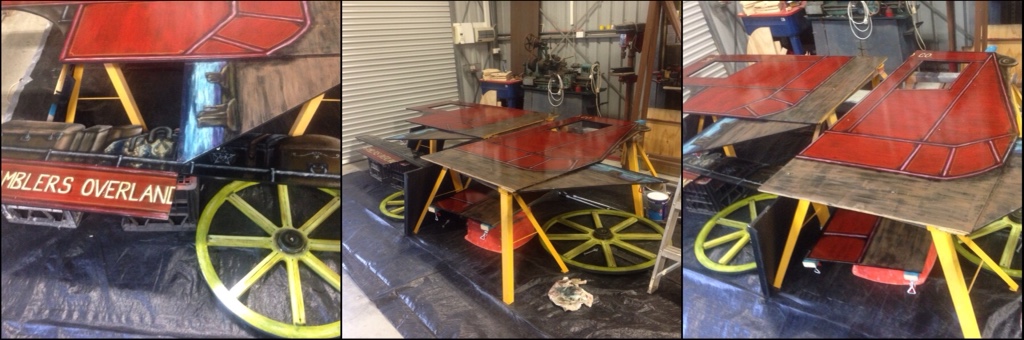
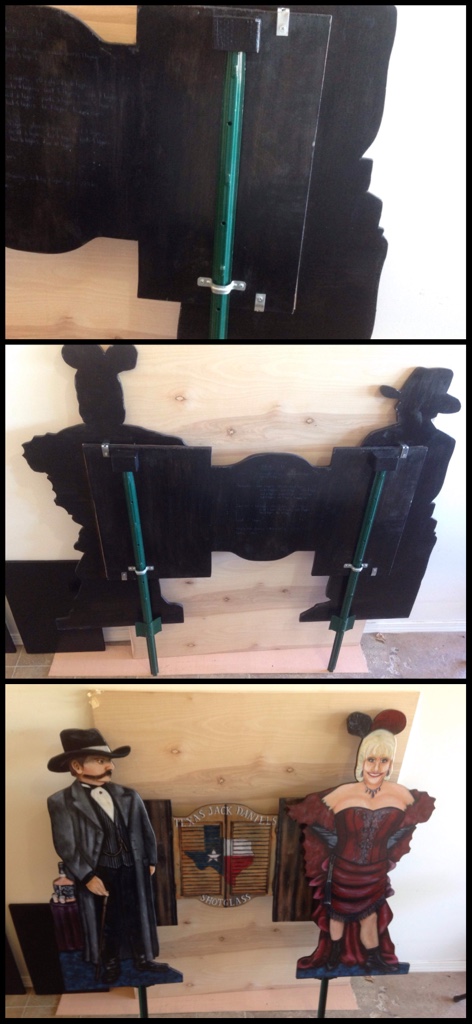
 

Stage 30: assembled


Stage 31: brackets and posts – thanks to Jack for working out a better solution of my half baked idea.


Total layers: Gambler – carpet 5, table 5, bottle and glasses 6, boots 4, coat 5, cane 4, vest 6, pants 3, hair 5, hat 5, tie 7, face 10.

Total layers: Saloon Girl – carpet 5, boa 5, gloves 3, skirt 7, corset 8, fan 4, boots 5, hair 6, face and skin 10.

A total of 39.5 hours later over a period of days, this is what we finally have!

The photos don't do it justice and I think they will be more than ecstatic when they finally have it in real life, come Land Run, when it will make its initial appearance on range.

That was a fun piece!

Cheers! Kat xo


Vaquero

I've been procrastinating a little on this one but finally worked out what I was going to do and got it done.

The order was for a vaquero jacket but 'I don't want it shiny! I want it to look worn in' was the request. Okay……so I had to start thinking dyeing and distressing, shouldn't be a problem.

Eventually I found the right colour fabric we were after in a sturdy medium.

I sourced a braid that goes really well with it and different to other soutache braids I had been working with previously. This worked extremely well with the curves I needed. It's a little coarser than the usual soutache but worked well for this project.

I wanted to include some sort of studs or riveting this time but thinking of the 'non shiny' scenario, it was back to the Internet to look at techniques for distressing nickel.

One hundred, shiny nickel rivets spent a good 2 hours soaking in some vinegar, then tipped that off, didn't seem to do anything.


Next step, hydrogen peroxide and salt! Holy cow, don't want to leave it in that too long unless you want stuff completely rusted! I think I did that for a bout 15mins maximum getting the desired result.


In the meantime, it was time to put the pieces together. Chalk pouncing (well baby powder in this case) and drawing up the designs with chalk. I could now get on with pinning and stitching the braid in place.


Next came the lining and something didn't look right. Well actually it wasn't looking right before that and I had kept going back to the pattern trying to work out where I'd gone wrong. Finally the light bulb goes off! Thankfully nothing major and nothing that a quick unpick/seam ripper, a pair of scissors, a different pattern piece couldn't fix! AND it didn't involve redoing the braid. Phew!


Everything is now together and it's onto the riveting. Yee haw looking fantastic! Hand sewing to the hem done. Frogs made, stitched on and my special silver buttons that I gave up to this project.


I love it but it's still too 'shiny' so taking a scrap piece I start playing with bleach to trying get some areas to take on a sun damaged effect. Different strengths appear to not have made a scrap of difference to the overall colour. So this morning I mixed a sprayable mix of white and cream acrylic paint to simulate some sweat marks.


I'm going to have to play more with this procedure. Stay tuned!

Kat xo


That’ll be the day!

Said John Wayne as Ethan Edwards in “The Searchers” (1956) and that's exactly what I thought when Petticoat Parker asked if I'd seen any John Wayne inspired fabric.

'Whoa, take 'er easy there pilgrim' I thought (John Wayne as Tom Doniphon in The Man Who Shot Liberty Valance (1962)) I've never seen any John Wayne fabric but I sure was going to see if I could find anything like it for her.

I did! To my wonder and surprise Spoonflower had two designs featuring John Wayne. So therefore, Petticoat Parker's corset, matching reticule and Red River Raider's matching arm bands came to be!

Now if you haven't kept up with what's going on here, in a months time, Winter Range begins and this year the theme is John Wayne movies. So I just had to find fabric appropriate for her gear.

'Slap some bacon on a biscuit and let's go! We're burnin' daylight!' – as Wil Anderson in “The Cowboys” (1972). They are done and already in her hot little hands!


Wish I could be there but keep your eye out for these little beauties on the range in Phoenix! Go check out Winter Range, at the Ben Avery Shooting Facility Feb19th-25th, 2018. 700 or more shooters, Fastdraw and Mounted Shooting included.


Kat xo